Dashboard Settings
The Settings page is your home base for a few handy controls: switching the dashboard between light and dark appearance, jumping to your personal account, and — for the events calendar — re-generating the schedules that tell your screens what to play. If you are an organization admin, it is also where you set options that apply to everyone in your organization.
To open it, click Settings in the dashboard's left-hand menu.
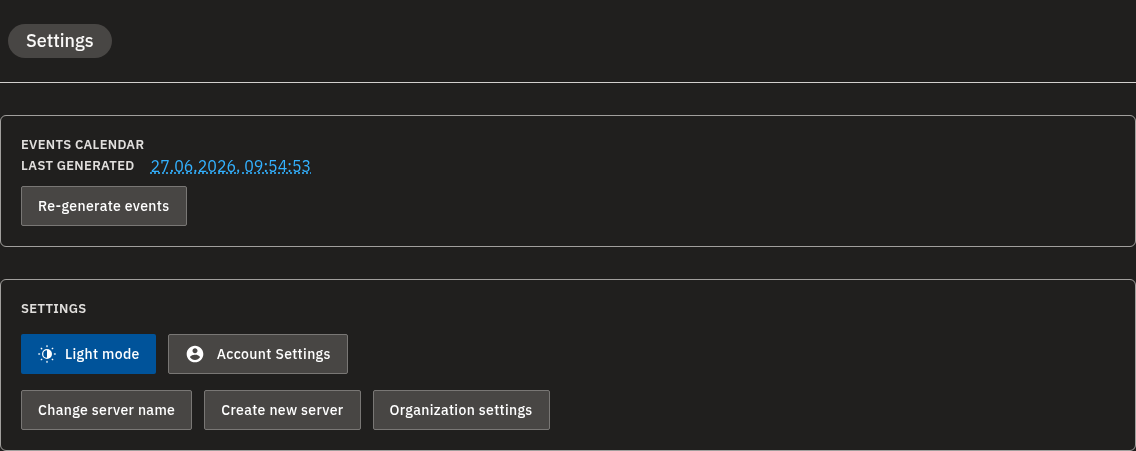
What's on the page
The Settings page has two main panels:
| Panel | What it's for |
|---|---|
| Events calendar (top) | Shows when your playback schedules were last rebuilt and lets you re-generate them. |
| Settings (below) | Switch appearance, open your Account Settings, and (for admins) open Organization settings. |
Info
The Events calendar panel only appears for accounts that manage displays and scheduling. If your role is focused on content and playables, you may not see it — that's normal.
Switch between light and dark appearance
- Open the Settings page.
- In the lower Settings panel, click the appearance button to switch between light and dark mode.
The dashboard switches appearance right away, and your choice is remembered the next time you visit. Click the button again to switch back.
Open your personal Account Settings
- Open the Settings page.
- In the Settings panel, click Account Settings.
You are taken to your personal account page, where you manage things like your own password, phone number, two-factor authentication, and your recent sign-in history. See Your Account Settings for the details.
Re-generate event lists when a screen is out of sync
Your screens follow playback schedules (event lists) that are built from your playlists and display setups. If you change a playlist or a display's setup and a screen is still showing the old content, re-generating the event lists rebuilds those schedules so screens pick up your latest changes.
- Open the Settings page.
- In the Events calendar panel, check the Last generated time so you know when the schedules were last rebuilt.
- Click Re-generate events. Regeneration starts immediately and runs in the background on the server.
- Give it a short while to finish. The Last generated time updates when it's done, and your screens pick up the latest playlist and display changes.
💡
A good time to use Re-generate events is when a screen seems out of sync — for example, it's still showing old content after you changed a playlist or adjusted a display.
Warning
Re-generating runs in the background on the server, so changes don't appear on screens instantly — allow a little time for everything to update. If you're browsing another department read-only, you can see this page but can't re-generate events — see Departments, Users & Roles.
Organization-wide options (organization admins)
If you are an organization admin and your account belongs to an organization, the Settings panel also shows an Organization settings button. Clicking it opens a side panel with switches that apply to everyone in your organization.
Info
The Organization settings button only appears for organization admins whose account belongs to an organization. If you don't see it, you don't have access to these options.
Require two-factor authentication for everyone
The Force 2FA for all users switch requires every user in your organization to use two-factor authentication.
Before you can turn this on, you must have two-factor authentication enabled on your own account. Until you do, the switch and the Save button stay disabled, and a hint explains why.
- First, make sure two-factor authentication is enabled on your own account. See Two-Factor Authentication.
- Open the Settings page and click Organization settings.
- Turn on Force 2FA for all users.
- Click Save. From then on, every user in your organization is required to use two-factor authentication.
Allow or block cross-department viewing
The Allow cross-department view switch controls whether departments can see one another's resources.
- On: users in one department can view and reference resources from other departments in read-only mode.
- Off: each department is fully isolated.
- Open the Settings page and click Organization settings.
- Turn Allow cross-department view on or off.
- Click Save to apply the change to all departments.
Info
Allow cross-department view is available only to the top-level organization admin. Other admins who can open Organization settings won't see this switch. For more on how departments work, see Departments, Users & Roles.
💡
The Settings page may also show Change server name and Create new server buttons. Only Organization admins see these; they relate to managing your servers and are covered in a separate article.
FAQ
A screen is still showing old content after I changed a playlist. What should I do? Go to Settings, and in the Events calendar panel click Re-generate events. This rebuilds the playback schedules for all active displays so screens pick up your latest playlist and display changes. It runs in the background, so give it a short while to take effect.
How do I switch the dashboard to dark mode? Open Settings and click the appearance button to switch between light and dark mode. The dashboard switches immediately and remembers your choice. Click it again to switch back.
Why can't I turn on "Force 2FA for all users"? You must enable two-factor authentication on your own account first. Until you do, the switch and the Save button stay disabled. Set up 2FA in your account (see Two-Factor Authentication), then return to Organization settings.
What does "Allow cross-department view" do? When enabled, users in one department can view and reference resources from other departments in read-only mode. When disabled, each department is fully isolated. It's set in Organization settings and is available to the top-level organization admin.
Where do I change my own password or set up my own two-factor authentication? On the Settings page, click Account Settings to open your personal account page, where you manage your own login and security details.
Need help?
Still stuck? Reach out to our support team and we'll be glad to help. You may also find these articles useful: Your Account Settings, Two-Factor Authentication, Departments, Users & Roles, and Signing In.